 With age comes habits, some good and some bad. My bad habit is not measuring things when I'm building a project, avoiding a tape measurer or ruler as much as I can. Story sticks have been my building process for as long as I can remember, I mark it out in the being of a project and never look back with any doubt or wondering if boards are the same size or second guessing joinery locations. My first job in woodworking was in a cabinet shop were they built custom cabinets. Gluing up panels for whatever the project was is where it all started. Eventually I was constructing cases and during this time period is where I learned about story sticks, there really were not many tape measures if any to be found. There was a wall in the back of the shop with measurements laid out on it and from this story sticks were made for the various projects. Looking back I realize how great of a system this was and think about doing something like this in my own shop if it were not for the lack of wall space I have in my little shop so I tend to use a yard stick to lay out my story sticks. Ultimately do what works for you or or whatever you're comfortable with, for me I will be using story sticks probably till the day leave this place. 
0 Comments
 Not doing something for any amount of time then coming back to it creates a lot of moments, some fun and some not fun. Coming back into creating content on youtube is certainly falling into both of these situations from equipment failures or just simply not remembering how to do things, not sure how much of that is age though. As everything stands right now I have no bandsaw or jointer but I'm pushing forward, and the current project is milled and sitting in pieces on my bench ready to start sizing so that I can start the joinery. My hand planes are all sharpened up and ready to pick up the lack of a jointer but not having a bandsaw hurts for things like dovetails or tenons joints because this has been my go to for years and with the current project the case is constructed with dovetails making the lack of a bandsaw a challange but an ok one, it just takes me back to resharpening my handtool skills and honestly they are something that can always use work. My goal is a new video every Friday even if it's just me blabbling about what I'm doing in the shop, and to keep myself busy this coming year.  Do you have to use dovetails in drawer construction? I think it depends on a few things, one is who you ask and two is what are your expectations for whatever your building. If you ask someone concerned about their public views and subscribers, their answer will always be no. If you ask a fine furniture builder they will almost always tell you yes. I really think it comes down to what are your expectations for the piece your building. If I'm building set of cabinets with drawers for my shop then chances are pretty good those drawers are not going to have dovetails. But if I'm building a piece of furniture for a client or my home that is a statement of my ability and craftsmanship then you bet it is going to have the fanciest looking dovetailed drawers on the block. There is just no way I could ever build what I deem to be a beautiful piece of furniture then screw the drawers together, or any other way. It has nothing to due with how strong it may or not be, but it does have everything to do with the craftsmanship and pride that I put into each piece I build. But I'm just an old guy building things and everyone needs to do what they are comfortable doing.  With age comes habits, some good and some bad. One thing I have found myself guilty of is the amount of things I fail to measure. Now weather this is a good or a bad habit I really don't know, but I do it to ensure the accuracy of my work. The problem came when I first started build furniture, no matter how much measuring I did something would always be off especially when I would do things like case work. After a lot of struggles a friend of mine introduced me to a story stick and everything became so much easier almost over night. My measurements became more accurate and as a result my woodworking became more accurate than I needed it to be, to say I was happy is a major understatement. A story stick much like a ruler has markings for distance on it, one inch, one foot, ect. The difference being the only markings on the story stick are the ones you put on it, making for no thought when it comes to the repetition of a joint, a cut length or what ever it is you are doing. Just follow the marks and it will always be the same. Now don't get me wrong a tape measurer or a good ruler still has it's place in my shop, but the majority of it's time is spent creating my story sticks. 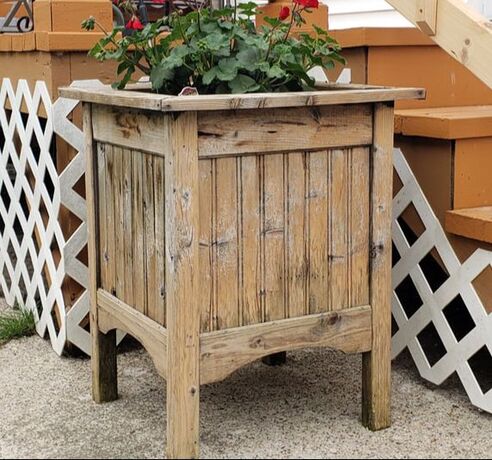 About thirteen years ago I built my wife a set of dry planter boxes that sit at the end of the steps coming into our home. Not some amazing work of craftsmanship or anything, just pine planter boxes made to have potted plants placed in side them that have sat outside all year round for the last thirteen years. I seems too often I get questions about finishing outdoor projects. And my thought is what are your expectations for what you're building. For me things like the planter boxes I built, I wiped on whatever it was and forgot about it. As the years have gone by the finish is gone and the wood has distressed and worn from the elements creating a look that I think is better than when I first built them. For something like these boxes that's okay, when they eventually rot it's a easy task to build new ones. Right around this same time I also build a new storm door for our home, this was different. I knew it would see a lot of use and with eleven grandkids probably a lot of abuse as well. So I wanted to build this once and not have to worry about it again for a while. My finish on this was made up of a good epoxy sealer with a varnish top coat, and with a few touch ups over the years it still looks good. Back to your expectations what you need to know is that they will only be as good as the effort you put into them. If you choose a cheap finish that is what you will get, and if you take the time to apply a good quality finish you will get quality results. 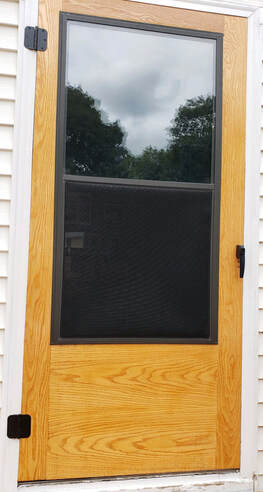 When my wife and I first moved into our home one of the first things I had to replace was the storm door. Not a big job we drove out to our local box store picked out the one we wanted drove home and I installled it. A proud new investment and a task completed on the to do list. Fast forward a few years later and our investment was less then grand, the door started to delapidate among other issues with it and being less than happy we just excepted it and moved on with another new door. My first thoughts when this happened where of logic, you know things happen. Maybe faulty materials or a manufacturing issue I wasn't really sure, but what ever the problem was I was sure that it was behind me by replacing it. Except I forgot that thing called Newten's Law, and I ended up in the same situation with this door. At this point in the road I was completely done with box store and I went into my shop to build a storm door. At the time I had a bunch of oak on hand, not ideal but I though it can't be worse than what I'm dealing with now so I moved forward. And with a few mortises and tenons then borrowing the window assembly from the old storm door before I new it I was done. I had built my own storm door, the best part of this story is that as of today that door has been on my home longer than the first two doors together and still looks just as good as the day I built it. I think the lesson to be learned in all this is you get what you pay for, if you spend a few dollars you'll get a few mile out it. But the next time that woodworker tells you it will cost more then you can buy it for at a box store, understand that you are getting a craftsmanship that can't be bought and true craftsmanship will stand the tests of time.. So you have to ask yourself. Do you want something that will last or do you just want to get by ? 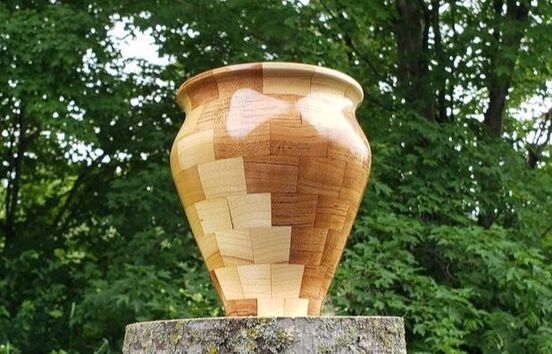 Recently I was asked what was the most difficult thing I've ever built. Now having been asked this before my usual response is boarder line smart aleck, and usually implies that nothing is hard followed up with a big smile. There almost always seems to be an assumption of pieces like the slant top desk I built as being difficult, and I think it's because of the intricacy of the desk's gallery. The truth is, it wasn't difficult it was time consuming with a huge attention to detail. But in fairness I think everyone has their own idea of what difficult is, for me it would be a project that involves multiple angles that have to be cut precise with lots of repetition involved. Having turned a few segmented vases and bowls they fall into this category. Several small pieces of wood cut at a given angle then glued together to form hopefully the perfect ring, repeated multiple times to create several more rings. Some smaller, some larger and then all stacked and glued together then with your fingers crossed and one eye open you turn it on the lathe and hopefully end up with tight glue joints and a beautiful new creation, if not you end up with a lesson and another log for the fire. Segmented wood turnings create a challenge that I will always enjoy, and for their difficulty are at the top of my list. If you have never attempted a segmented turning give it try, you will not regret either the challenge or the results when you get it right. It's a lot to be proud of and I have a lot of respect for the people who have made this their world in woodworking. 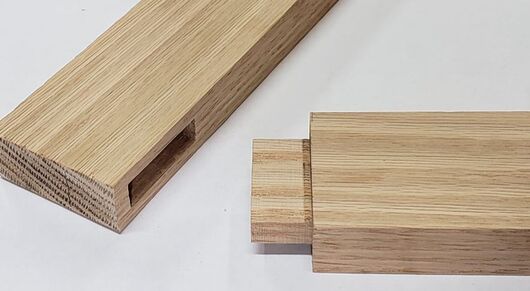 The first time I cut a tenon I started by taking my time marking it out with my marking gauge, then with complete confidence I made my cuts and removed the waste material and after a little clean up I test fit the tenon into the mortise only to discover the shoulders of my tenon were out of square, forcing me to fuse around with my shoulder plane until I finally achieved a good square fit. This problem stayed with me for sometime, I would cut a tenon and then have a problem with the shoulder not being square. I tried using different marking gauges thinking maybe this was the problem, trying wheel gauges, knife gauges but nothing seemed to make a difference. Eventually I realized the problem was never in the marking gauges, it was in the material. When using a marking gauge to mark tenon shoulders the gauge references from the end of the board, and if the end of the board is not true it will cause the shoulder line to be out square, and it doesn't take much to have an issue. But if you reference from the side of a board these marks will be immensely accurate. So what I started doing is using my starrett and a marking knife to lay out my tenon shoulders referencing from the side of the board. Since I started created tenons this way I no longer have fit issues with my mortise and tenon joints. 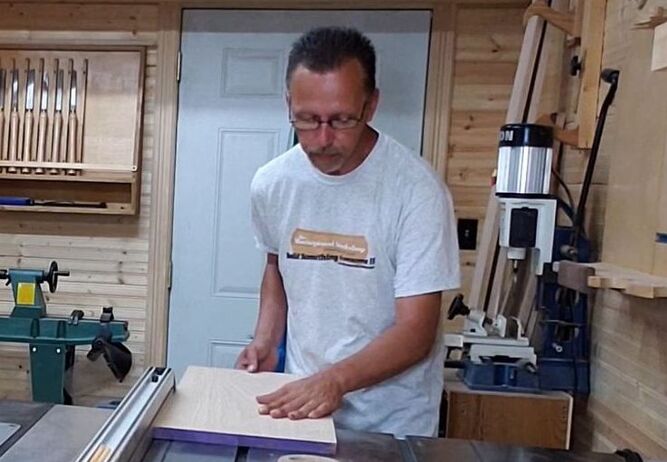 One of the most common questions is how do I build this thing ? This table, box, chair or whatever this thing might be. Honestly just build it. The bottom line is the knowledge of how to build something comes from building it and the more you build it the better you will be at it. Nothing is a better teacher than repeating the same task over and over again, especially with the basics of woodworking. And over thinking it will almost always put a fast ending to what would have normally been a great idea. As woodworkers we always push our selves to try and be better than the last thing we created and we should, because this is how we grow both in knowledge and ability. But as a person building something for the very first time ever, it can be intimidating when you look at the way advanced woodworkers do things. Mortises, haunched tenons, dovetails and even the more common half blind dove tail is a lot to understand when you have no knowledge of any of it. My best advise to the first time woodworker is to just do what works for you, then do it again and again. This is how you gain the knowledge your looking for and grow in this craft. Because there is no rule that says you have to build anything a certain way, if there was things like the Maloof joint would have never happened. Just don't over think it and do what works for you, and when your done you will be glad you did. 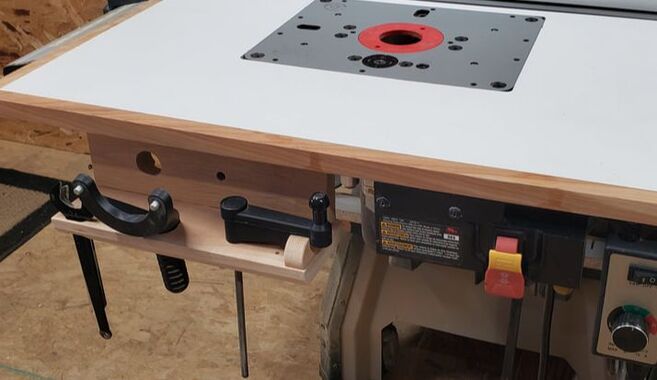 I have always thought of myself as organized when it comes to my shop. This goes here, that goes there, and I always put it back where it was. Until the other day when I was using my router table. My router table is an extension wing of my table saw with a router lift that requires a couple of special tools to set it up, and I keep these tools with the wrenches required for the router on an opposite wall of my shop. My router bits are also organized in a cabinet on another wall of my shop. So to use my router table I go from the router table to a wall on the opposite side of my shop to get the tools I need to set it up, then go to another wall to grab the router bit I need. It was in this mindless journey around my shop that I had to point out to this master of organization, ( being myself ) maybe I'm not as organized as I could be. Realizing this skill set I seem to some how poses, I took a look around my shop to see what other amazing feats of organization I had been unaware that I have achieved through the years. And just like the family dog searching the floor for crumbs I found a few. Now if you look around my shop everything appears to have a place or be organized in a way that makes sense, but there are a lot of little things like my router table accessories that if they were all at the router table would certainly make more sense. So as a man with a new found plan I went to my scrap bin and found what would soon be greatest tool organizer of all time for my router table, then went to work building a miracle of craftsmanship. Okay it's just an L-shaped bracket constructed from a couple of scraps then screwed to the bottom of my router table, but all of my tools are now right at my router table and that's awesome. |
The Shavingwood Workshop Blog
Archives
June 2024
Categories |
 RSS Feed
